GitHub — A Beginner’s Introduction

Introduction
GitHub has transformed the landscape of software development collaboration. Drawing on my 20 years of experience in this field, I’ve witnessed the transformative power of this platform in action. Whether you’re a newcomer or a seasoned user, this guide is here to provide valuable insights and demystify GitHub’s inner workings. Let me help you navigate this indispensable tool and maximize its potential for your solo and collaborative projects.
Understanding GitHub
GitHub is a cloud-based hosting service that provides developers with a user-friendly interface to manage Git repositories. It offers many tools, including bug tracking, task management, and continuous integration, making it a go-to platform for software collaboration. Think of it as a library, each repository acting like a book. Multiple authors (developers) can work on different chapters (branches) without affecting the main story or main branch.
More than just a platform, GitHub is a community where developers collaborate on projects. With features like Repositories, Forks, Pull Requests, Issues, and GitHub Actions, you can store your project, experiment with personal copies, propose changes to a repository, track tasks, enhance your project, and automate workflows.
For example, suppose you’re working on a web application. In that case, you can use GitHub to host your project (repository), keep track of issues like bugs or feature requests, and collaborate with other developers through pull requests.
Setting Up and Navigating GitHub
- Create a GitHub account: Visit github.com and sign up.
- Navigate the interface: Explore the dashboard, your profile, repositories, and settings.
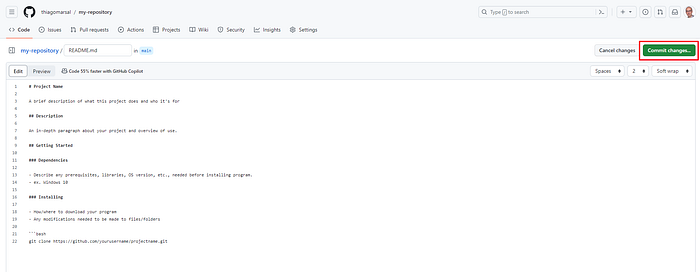
- Create a repository: Click “New” on the Repositories tab, name your repository, and add a README file.


- Copy and Paste the example below into your README file.
# Project Name

A brief description of what this project does and who it's for

## Description

An in-depth paragraph about your project and overview of use.

## Getting Started

### Dependencies

- Describe any prerequisites, libraries, OS version, etc., needed before installing program.
- ex. Windows 10

### Installing

- How/where to download your program
- Any modifications needed to be made to files/folders

```bash
git clone https://github.com/yourusername/projectname.git
The link below can lead you to several examples of README files you can play with.
Then, commit your changes.
Now, you have made your first change into your first repository.
Downloading and Installing Git
GitHub is a cloud-based hosting service with a hub for storing Git repositories. It is a central place for team members to push their local Git changes and collaborate on code. Git, on the other hand, is a tool that tracks the history of changes in your local repository. Using GitHub, these changes can be shared with others, tracked, and collaborated on at a higher level.
To summarize, Git and GitHub go hand in hand. Git offers local version control features, while GitHub extends these to the cloud, enabling remote collaboration, backup, and other project management capabilities. Therefore, it is necessary to install Git in the local environment.
- Visit the Official Git Website: Open your web browser and go to Git’s official website.
- Choose Your Operating System: Git is available for Windows, macOS, and Linux. Select the version that matches your operating system.
- Download Git: Click on the download link. The website usually detects your OS and provides the appropriate version.
- Run the Installer: After downloading, locate and run the Git installer (
.exefile). - Follow the Setup Wizard: The setup wizard will guide you through several steps.
- Select Components: You can leave the default components selected.
- Choosing the Default Editor: Git will ask you to select a default text editor for committing messages. You can choose one from the list or stick with the default (usually Vim).
- Adjusting Your PATH Environment: Choose whether to use Git from the command line and third-party software or restrict it to the Git Bash shell.
- Configuring the Line Ending Conversions: You can leave the default selection as is.
- Installing: Click “Install” to begin the installation.
Open the Command Prompt or Terminal.
Type git --version and press Enter. This command should return the installed version of Git, confirming a successful installation.

Configure Git (Optional but Recommended)
- Configure your username:
git config --global user.name "Your Name". - Configure your email:
git config --global user.email "your.email@example.com".
Basic Git Commands
git clone [URL]: Copy a remote repository to your local machine.git pull: Fetch and merge changes from the remote server to your working directory.git push: Send your committed changes to the remote repository.git commit -m "[commit message]": Commit your changes with a message explaining what you've done.

https://git-scm.com/docs/git#_git_commands
Branching and Merging with GitHub
Branching means diverging from the main line of development and continuing to work without affecting that line. In Git, branches are incredibly lightweight, making switching between branches quick and easy.
Merging is the process of integrating changes from one branch into another. It’s a critical step in bringing a branch’s changes back into the main branch (master or main) or any other development branches.
Merge Types:
- Fast-Forward Merge: This occurs when there are no additional commits in the receiving branch since the branching point. Git moves the pointer forward.
- Three-Way Merge: This is used when there have been commits in both branches since the branching point. Git automatically creates a new commit that combines the changes.
Steps to Create a new branch and merge into the main branch
- Create a branch: Use
git branch [new-branch]to create a new branch. - Switch branches:
git checkout [branch-name]let you switch to your new branch. - Merge branches: After completing your work in a branch, you can merge it back into the main branch.
- Switch back to the main branch:
git checkout main - Merge changes from the new branch into your main branch:
git merge [new-branch]
GitHub Flow and GitFlow
- GitHub Flow: Simple and involves creating a branch, adding commits, opening a pull request, and merging changes after review.
- GitFlow: More complex, with dedicated branches for development, features, releases, and hotfixes.
In the GitHub Flow, changes are integrated directly into the main branch after review. On the other hand, in GitFlow, a feature may be merged into a development branch first. GitFlow has many features and requires a detailed article to explore them. Therefore, we will explore how to manage branches using GitFlow in another article, given its complexity in the image below.

Git applied to Project
A project board in GitHub is used for tracking progress in software development. It helps organize and prioritize your work within a repository or across repositories. They can be used to create customized workflows that suit the needs of your project.

Above, we see a GitHub project board with several columns that categorize tasks at different stages of development:
- To Do: Tasks that have been identified and are pending action. They’re the starting point for new work items.
- In Progress: Tasks that are currently being worked on by the team. Moving tasks to this column signals that development has started.
- Done: Completed tasks. Once a task is finished, it’s moved here to indicate that it’s ready for the next phase, which might be deployment or testing.
Each column contains cards that represent individual tasks or issues. These can range from new features (labeled as “Feature”) to bug fixes (“Bug Fix”) and code reviews (“Code Review”). The cards can be moved from one column to another as the status of the task changes, providing a visual representation of the project’s workflow. The project board in the image shows a well-organized structure where tasks are clearly defined and categorized, offering a snapshot of the project’s current status at a glance. This aids collaboration, as team members can easily see what others are working on and what tasks are next in line. It also helps in managing workload and tracking progress toward milestones.
Conclusion
GitHub is a crucial tool for software development today. By grasping its central features and following best practices, you can improve your projects and collaborate effectively, regardless of their size. Understanding GitHub’s features and best practices can significantly increase your project’s efficiency and your team’s collaboration.
References
Chacon, S., & Straub, B. (2014). Pro Git. Apress.
Get started with GitHub documentation. (n.d.). GitHub Docs. Retrieved December 15, 2023, from https://docs.github.com/en/get-started