Java - Fundamentals
What is Java?
Java is one of the most popular programming languages in the world and is widely used to develop a wide range of applications, from simple mobile apps to complex enterprise systems. Learning Java is valuable for anyone interested in pursuing a software development or programming career. This book is designed to help beginners learn Java programming from scratch, regardless of their programming background.
Getting Started
This section will introduce Java and its features. We will learn how to download and install the Java Development Kit (JDK) and set up our development environment. We will also write and run our first Java program using the command prompt.
- Go to the official Oracle website at https://www.oracle.com/java/technologies/javase-downloads.html.
- Choose the appropriate version of the JDK for your operating system. Click the “Download” button for the version you want to download.
- Once the download is complete, run the installer.
- Follow the instructions provided by the installer to complete the installation process.
- After the installation is complete, you will need to set up your development environment. This involves setting up environment variables that point to the JDK installation directory.
- Open the Control Panel on Windows or System Preferences on Mac OS X.
- Click on the “System” or “System and Security” option.
- Click on the “Advanced system settings” option.
- Click on the “Environment Variables” button.
- Under “System Variables,” click the “New” button.
- Enter “JAVA_HOME” in the “Variable name” field.
- Enter the path to your JDK installation directory in the “Variable value” field.
- Click the “OK” button to save your changes.
- Under “System Variables,” scroll down and find “Path.”
- Click the “Edit” button.
- Add the path to your JDK’s “bin” directory to the end of the “Variable value” field.
- Click the “OK” button to save your changes.
- Close the Environment Variables window and the System Properties window.
- Open a command prompt or terminal window and type “java -version” to verify that the JDK is installed and set up correctly.


First Java program:
public class HelloWorld {
    public static void main(String[] args) {
        System.out.println("Hello World!");
    }
}
Compile a Java file to generate a binary class HelloWorld.class
Execute the generated class
$javac HelloWorld.java
$java HelloWorld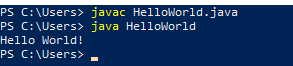
Java Basics
The basic building blocks of Java programming include data types, variables, operators, and control structures. We will also learn about object-oriented programming (OOP) concepts, like classes, objects, and methods later. But, for now, OOP is widely used for developing various software applications, such as Java, that provide a wide range of features and constructs that enable developers to create complex, robust, and scalable applications.
- Data Types: Java supports several data types that allow developers to define variables for storing data of different types. Java supports two main categories of data types: primitive and reference types. The primitive data types include int, double, boolean, char, byte, short, and long. The reference data types include arrays, strings, objects, and classes.
- Variables: In Java, a variable is a named memory location that holds a value of a specific data type. Variables in Java are defined using the syntax: data_type variable_name = value. For example, int num = 10; defines an integer variable named “num” with an initial value of 10.
- Operators: Java provides several operators that enable you to perform arithmetic, relational, and logical operations on variables and literals. Arithmetic operators include +, -, *, /, and %. Relational operators include <, >, <=, >=, ==, and !=. Logical operators include &&, ||, and !.
- Control Structures: Java provides several control structures that enable you to control the flow of program execution based on certain conditions. The control structures include if-else statements, switch statements, loops, and conditional operators. For example, the if-else statement tests a condition and executes a block of code if the condition is true, and another block of code if the condition is false.
Here’s an example program in Java that uses data types, variables, operators, and control structures:
public class HelloWorld {
    public static void main(String[] args) {
        int num1 = 10;
        int num2 = 5;
        int sum = num1 + num2;
        boolean isGreater = (num1 > num2);

        if (isGreater) {
            System.out.println("The sum is " + sum);
        } else {
            System.out.println("The difference is " + (num1 - num2));
        }
    }
}
Input and Output
In Java, several ways exist to input and output data. Here are some commonly used methods:
- Using Scanner class: The Scanner class reads input from the console.
import java.util.Scanner;

public class InputExample {
    public static void main(String[] args) {
        Scanner scanner = new Scanner(System.in);

        System.out.print("Enter your name: ");
        String name = scanner.nextLine();

        System.out.print("Enter your age: ");
        int age = scanner.nextInt();

        System.out.println("Your name is " + name + " and your age is " + age);
    }
}- Using BufferedReader class: The BufferedReader class is used to read input from the console or a file.
import java.io.BufferedReader;
import java.io.IOException;
import java.io.InputStreamReader;

public class InputExample {
    public static void main(String[] args) throws IOException {
        BufferedReader br = new BufferedReader(new InputStreamReader(System.in));

        System.out.print("Enter your name: ");
        String name = br.readLine();

        System.out.print("Enter your age: ");
        int age = Integer.parseInt(br.readLine());

        System.out.println("Your name is " + name + " and your age is " + age);
    }
}- Using System.out.println() method: The System.out.println() method outputs data to the console.
public class OutputExample {
    public static void main(String[] args) {
        String name = "John";
        int age = 30;

        System.out.println("Your name is " + name + " and your age is " + age);
    }
}- Using PrintWriter class: The PrintWriter class is used to output data to a file.
import java.io.PrintWriter;

public class OutputExample {
    public static void main(String[] args) throws Exception {
        PrintWriter writer = new PrintWriter("output.txt");

        String name = "John";
        int age = 30;

        writer.println("Your name is " + name + " and your age is " + age);

        writer.close();
    }
}
Arrays and Collections
This section will cover arrays, collections, and essential data structures in Java programming. We will learn to declare and initialize arrays and use collections such as ArrayList and HashMap.
- Declaring an array: To declare an array, specify its type and size.
int[] numbers = new int[5]; // declares an int array of size 5
String[] names = {"John", "Mary", "Bob"}; // declares a String array with initial values- Accessing elements of an array: You can access the elements of an array using their index. The index starts from 0 and goes up to size-1.
int[] numbers = {1, 2, 3, 4, 5};
System.out.println(numbers[0]); // outputs 1
System.out.println(numbers[2]); // outputs 3- Iterating over an array: You can use a for loop to iterate over the elements of an array.
int[] numbers = {1, 2, 3, 4, 5};
for (int i = 0; i < numbers.length; i++) {
    System.out.println(numbers[i]);
}- Declaring a collection: To declare a collection, specify its type.
List<String> names = new ArrayList<String>(); // declares a List of Strings
Set<Integer> numbers = new HashSet<Integer>(); // declares a Set of Integers
Map<String, Integer> map = new HashMap<String, Integer>(); // declares a Map of Keys and Values- Adding elements to a collection: Using the add() method, you can add elements.
List<String> names = new ArrayList<String>();
names.add("John");
names.add("Mary");- Accessing elements of a collection: You can access the elements of a collection using an iterator or a for-each loop.
List<String> names = new ArrayList<String>();
names.add("John");
names.add("Mary");

Iterator<String> iterator = names.iterator();
while (iterator.hasNext()) {
    System.out.println(iterator.next());
}

for (String name : names) {
    System.out.println(name);
}- Removing elements from a collection: You can remove elements from a collection using the remove() method.
List<String> names = new ArrayList<String>();
names.add("John");
names.add("Mary");
names.remove("John");
Object-Oriented Programming (OOP)
Object-Oriented Programming — (OOP) is a programming paradigm widely used in Java. It focuses on creating objects that encapsulate data and behavior and interact with each other to solve problems. Here are the fundamental principles of OOP in Java:
- Classes and Objects: A class is a blueprint for creating objects, and an object is an instance of a class. A class defines the properties and behavior of an object, while an object is an instance of a class with its values for the properties.
- Abstraction: Abstraction is the process of hiding the implementation details of a class and only exposing the necessary information to the user. This allows the user to interact with the object without knowing how it works internally.
- Inheritance: Inheritance is the process of creating a new class from an existing class. The new class, called the subclass, inherits the properties and behavior of the existing class, called the superclass. This allows the subclass to reuse the code of the superclass and add its functionality.
- Polymorphism: Polymorphism is the ability of an object to take on many forms. In Java, polymorphism is achieved through method overriding and method overloading. Method overriding allows a subclass to implement a method inherited from the superclass, while method overloading allows a class to have multiple methods with the same name but different parameters.
- Encapsulation: Encapsulation is the process of hiding the internal details of an object from the outside world. This is achieved by making the properties and methods of an object private and only exposing a public interface for interaction with the object.
Below is an example of how OOP works in Java. This example defines it as a Car class with two properties (model and year) and two methods (startEngine and getters for model and year). Also, it created an instance of the Car class in the Main class and called its methods to start the engine and display the model and year.
public class Car {

    private String model;

    private int year;

    public Car(String model, int year) {
        this.model = model;
        this.year = year;
    }

    public void startEngine() {
        System.out.println("Starting the engine of " + model + "...");
    }

    public String getModel() {
        return model;
    }

    public int getYear() {
        return year;
    }
}

public class Main {
    public static void main(String[] args) {
        Car car = new Car("Toyota Camry", 2021);
        car.startEngine();

        System.out.println("Model: " + car.getModel());
        System.out.println("Year: " + car.getYear());
    }
}
Exception Handling
Exception handling is the process of detecting and responding to exceptional situations, such as errors or unexpected events, in a program. In Java, exception handling is achieved through the use of try-catch blocks. In summary, exception handling in Java allows you to detect and respond to exceptional situations in your program, ensuring it runs smoothly and without errors. Here are a few examples of how it works:
- Try block: The code that might throw an exception is enclosed in a try block. The control is transferred to the catch block if an exception occurs within the try block.
- Catch block: The catch block is executed if an exception occurs within the try block. It takes an exception object as a parameter, containing information about the occurred exception.
try {
    // code that might throw an exception
} catch (Exception e) {
    // code to handle the exception
}- Multiple catch blocks: You can have multiple catch blocks to handle different exceptions. The catch blocks are executed in order, and only the first one that matches the exception type is executed.
try {
    // code that might throw an exception
} catch (IOException e) {
    // code to handle IOException
} catch (Exception e) {
    // code to handle other types of exceptions
}- Finally block: The finally block is executed regardless of whether an exception occurs or not. It is often used to release resources, such as files or network connections, that were acquired in the try block.
try {
    // code that might throw an exception
} catch (Exception e) {
    // code to handle the exception
} finally {
    // code to release resources
}- Throw statement: You can use the throw statement to throw an exception in your code manually. This is useful for handling exceptional situations that the standard exception classes cannot handle.
if (age < 0) {
    throw new IllegalArgumentException("Age cannot be negative");
}- Custom exceptions: You can create your exception classes by extending the standard exception classes or creating a new class that implements the Throwable interface. This allows you to define the types of exceptions that are specific to your program.
public class CustomException extends Exception {
    public CustomException(String message) {
        super(message);
    }
}
Input/Output (I/O)
In Java, file input/output (I/O) is handled by the java.io package. This package provides classes and methods to read from and write to files. The java.io package provides several other classes and methods for file input/output operations, such as the BufferedReader and BufferedWriter classes for reading and writing text files and the RandomAccessFile class for reading and writing binary files. It’s important to properly close all streams and readers/writers when you’re done with them, which can be done using try-with-resources, as shown in the examples below.
Java 8 provides several ways to perform file input/output operations, such as the Scanner class for reading from a file, the PrintWriter class for writing to a file, and the Files.copy() method for copying files.
- Reading a file: You can use the BufferedReader class to read the contents of a file line by line:
try (BufferedReader br = new BufferedReader(new FileReader("filename.txt"))) {
    String line;
    while ((line = br.readLine()) != null) {
        System.out.println(line);
    }
} catch (IOException e) {
    e.printStackTrace();
}- Reading a file as a stream: You can use the Files class to read the contents of a file as a stream of lines:
try (Stream<String> lines = Files.lines(Paths.get("filename.txt"))) {
    lines.forEach(System.out::println);
} catch (IOException e) {
    e.printStackTrace();
}- Writing to a file: You can use the BufferedWriter class to write to a file:
try (BufferedWriter bw = new BufferedWriter(new FileWriter("filename.txt"))) {
    bw.write("This is the first line");
    bw.newLine();
    bw.write("This is the second line");
} catch (IOException e) {
    e.printStackTrace();
}- Writing to a file as a stream: You can use the Files class to write to a file as a stream of lines:
List<String> lines = Arrays.asList("This is the first line", "This is the second line");
try {
    Files.write(Paths.get("filename.txt"), lines);
} catch (IOException e) {
    e.printStackTrace();
}
Swing
Swing is a GUI (graphical user interface) toolkit for Java, which allows developers to create and design user interfaces for their Java applications. Overall, Swing is a powerful and helpful toolkit for creating GUIs in Java and is still widely used in many applications today. However, several other alternatives might be more popular. Thus, here are the basic steps to create a GUI using Swing in Java:
- Create a new JFrame object: The JFrame class is the top-level container in a Swing GUI. You can create a new JFrame object using the constructor:
JFrame frame = new JFrame("My Application");- Add components to the JFrame: You can add components, such as buttons, labels, text fields, etc., to the JFrame using the add() method:
JButton button = new JButton("Click Me!");
frame.add(button);- Set layout manager for the JFrame: The layout manager determines how the components are arranged within the JFrame. You can set a layout manager using the setLayout() method:
frame.setLayout(new FlowLayout());- Set JFrame size and visibility: You can set the size of the JFrame using the setSize() method and make it visible using the setVisible() method:
frame.setSize(300, 200);
frame.setVisible(true);- Add event listeners to components: You can add them to components like buttons to perform actions when the user interacts with them. This adds an ActionListener to the button, which prints a message to the console when clicked. Here is an example:
button.addActionListener(new ActionListener() {
    public void actionPerformed(ActionEvent e) {
        System.out.println("Button clicked!");
    }
});
In addition to these basic steps above, Swing provides many more components and features for creating rich user interfaces. For example, you can create menus using JMenu and JMenuItem, display images using ImageIcon, and use JFileChooser for file selection. You can also customize the appearance of components using styles and themes.
Networking
Java provides several classes and APIs for working with networking protocols such as HTTP and FTP. Here’s a brief overview of how networking with HTTP and FTP works in Java:
- HTTP: To make an HTTP request in Java, you typically use the HttpURLConnection class, a URLConnection class subclass. Here is an example of how to make a GET request to a URL using HttpURLConnection:
URL url = new URL("https://www.example.com");
HttpURLConnection conn = (HttpURLConnection) url.openConnection();
conn.setRequestMethod("GET");

// Read the response
BufferedReader reader = new BufferedReader(new InputStreamReader(conn.getInputStream()));
String line;
while ((line = reader.readLine()) != null) {
    System.out.println(line);
}
reader.close();
This code creates an HttpURLConnection object for the given URL, sets the request method to GET, and reads the response from the server using a BufferedReader.
- FTP: Java also provides APIs for working with FTP (File Transfer Protocol). The FTP protocol is used for transferring files between servers and clients. To use FTP in Java, you typically use the FTPClient class, which is part of the Apache Commons Net library. Here’s an example of how to connect to an FTP server and download a file using FTPClient:
FTPClient ftp = new FTPClient();
ftp.connect("ftp.example.com");
ftp.login("username", "password");
ftp.enterLocalPassiveMode();

OutputStream out = new FileOutputStream("localfile.txt");
ftp.retrieveFile("/remotefile.txt", out);

out.close();
ftp.logout();
ftp.disconnect();
This code connects to an FTP server, logs in with a username and password, sets passive mode, downloads a remote file to the local file system, and then logs out and disconnects from the server.
These are just a few examples of how networking with HTTP and FTP works in Java. Many more classes and APIs are available for working with different networking protocols, such as sockets, email, and more.
Conclusion
By now, you will have a solid understanding of the basics of Java programming and will be able to create simple Java applications. You will also have the foundation to continue learning more advanced topics in Java programming. Remember that practice is essential in learning to code, so keep practicing and exploring the vast world of Java programming!
References
Cay, H. (2018). Core Java Volume I - Fundamentals, 11th Edition. Publisher Name.
Sierra, K., & Bates, B. (2005). Head first java 2nd ed. O’Reilly.